AWS Lambda Authorization using Epic Online Services
Maybe you are considering to use Epic Online Services (EOS) for your next big multiplayer game, because the services are available for free and cross play is supported on several platforms. But you will almost certainly need further services to handle features like inventories, and maybe the Player Data Storage does not fit your requirements.
Calls to additional services/functions should be authorized just like EOS calls. However, since authorization is handled by EOS, you need to combine these two worlds.
Scope of this post
This article is about using EOS to securely authorize AWS Lambda calls. It covers the “new” AWS HTTP API Gateway (with builtin OAuth module) as well as the “traditional” AWS REST API Gateway (using a custom authorizer).
The Easy (Gate)Way
If you are using an AWS HTTP API Gateway to map your service API to Lambda functions, it is time to sit back and relax. Integration is very easy because this gateway comes with a builtin OAuth JWT (Json Web Token) authorizer. Simply open the “Authorization” section in the AWS console, click “Manage authorizers” and “Create”:
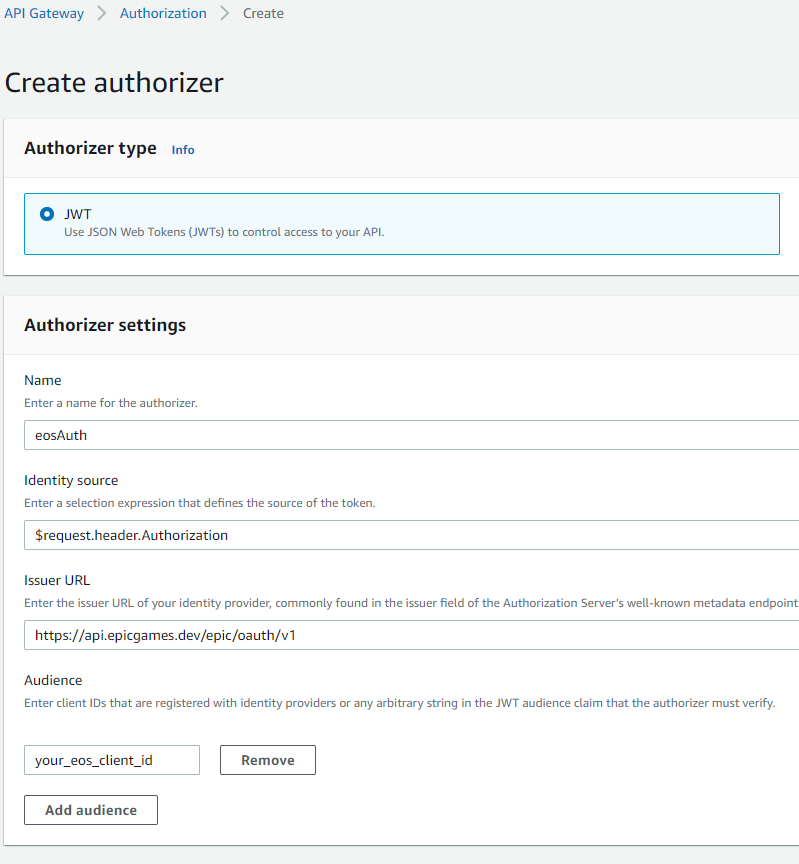
Values to enter:
- Identity source:
$request.header.Authorization - Issuer:
https://api.epicgames.dev/epic/oauth/v1
(Source for this: https://api.epicgames.dev/epic/oauth/v1/.well-known/openid-configuration) - Audience: Enter your client id (as shown in the Epic Games developer portal product settings)
Afterwards, use Attach authorizers to routes to assign this authorizer to your Lambda mappings. From now on, your calls are authorized using EOS OAuth.
(Of course there are several other ways to create an authorizer, like AWS CLI create-authorizer, but these are not subject of this post.)
Client Example
Calling an EOS authorized service using C# is pretty straightforward:
Updated 2021-09-30: As of now, the EOS documentation recommends using CopyIdToken to verify identity instead of CopyUserAuthToken, see https://dev.epicgames.com/docs/services/en-US/API/Members/Functions/Auth/EOS_Auth_CopyIdToken/index.html
// Retrieve a copy of the access token using EOS C# API.
// You need the EOS local user id for this call.
// It is supplied for example in the EOS OnLogin Callback, callbackInfo.LocalUserId
CopyUserAuthTokenOptions tokenOptions = new CopyUserAuthTokenOptions();
User.PlatformApplication.PlatformInterface.GetAuthInterface().CopyUserAuthToken(
    tokenOptions, localUserId, out Token token);
// Call WebService with Token Authorization.
// "using (HttpClient ...)" is only for simplicity, you should reuse HttpClient!
using (HttpClient httpClient = new HttpClient())
{
    httpClient.DefaultRequestHeaders.Authorization = new AuthenticationHeaderValue(
        "Bearer", token.AccessToken);
    HttpResponseMessage response = await httpClient.GetAsync(
        "https://your-aws-endpoint/your-entry-point");
}
The Hard (Gate)Way
Even though the HTTP API Gateway usually is the best choice due to better performance and lower price tag, there are some reasons you may prefer to use the AWS REST API Gateway.
The REST gateway does not support OAuth “out of the box”. You have to create a custom authorizer function.
EOS Authorizer Function Example
The following code implements a simple Lambda authorizer in Go, which has low cold start latency. It uses the EOS WebAPI “tokenInfo” function to validate tokens.
package main

import (
	"encoding/json"
	"errors"
	"github.com/aws/aws-lambda-go/events"
	"github.com/aws/aws-lambda-go/lambda"
	"log"
	"net/http"
	"net/url"
	"os"
	"strings"
	"time"
)

type tokenInfo struct {
	Active        bool      `json:"active"`
	Scope         string    `json:"scope"`
	TokenType     string    `json:"token_type"`
	ExpiresIn     int       `json:"expires_in"`
	ExpiresAt     time.Time `json:"expires_at"`
	AccountId     string    `json:"account_id"`
	ClientId      string    `json:"client_id"`
	ApplicationId string    `json:"application_id"`
}

func handleRequest(request events.APIGatewayCustomAuthorizerRequest) (events.APIGatewayCustomAuthorizerResponse, error) {
	token := request.AuthorizationToken
	const eosTokenInfoUrl = "https://api.epicgames.dev/epic/oauth/v1/tokenInfo"
	const envClientId = "AUTH_EOS_CLIENT_ID"
	const envAppId = "AUTH_EOS_APP_ID"
	const envSeparator = ":"

	// EOS tokenInfo also works with Bearer prefix, but we are removing it due to RFC7662 section 2.1
	data := url.Values{}
	data.Set("token", strings.TrimPrefix(token, "Bearer "))

	resp, err := http.Post(eosTokenInfoUrl, "application/x-www-form-urlencoded", strings.NewReader(data.Encode()))
	if err != nil {
		log.Println("EOS error: " + err.Error())
		return events.APIGatewayCustomAuthorizerResponse{}, errors.New("unauthorized")
	}
	defer resp.Body.Close()

	var authInfo tokenInfo
	err = json.NewDecoder(resp.Body).Decode(&authInfo)
	if err != nil ||
		!authInfo.Active ||
		authInfo.AccountId == "" ||
		!contains(strings.Split(os.Getenv(envClientId), envSeparator), authInfo.ClientId) ||
		!contains(strings.Split(os.Getenv(envAppId), envSeparator), authInfo.ApplicationId) {

		return events.APIGatewayCustomAuthorizerResponse{}, errors.New("unauthorized")
	}
	return generatePolicy("user", "Allow", authInfo.AccountId, request.MethodArn), nil
}

func generatePolicy(principalID, effect, accountId, resource string) events.APIGatewayCustomAuthorizerResponse {
	authResponse := events.APIGatewayCustomAuthorizerResponse{
		PrincipalID: principalID,
		Context: map[string]interface{}{"accountId": accountId},
	}

	if effect != "" && resource != "" {
		authResponse.PolicyDocument = events.APIGatewayCustomAuthorizerPolicy{
			Version: "2012-10-17",
			Statement: []events.IAMPolicyStatement{
				{
					Action:   []string{"execute-api:Invoke"},
					Effect:   effect,
					Resource: []string{resource},
				},
			},
		}
	}
	return authResponse
}

func contains(container []string, value string) bool {
	for _, item := range container {
		if item == value {
			return true
		}
	}
	return false
}

func main() {
	lambda.Start(handleRequest)
}
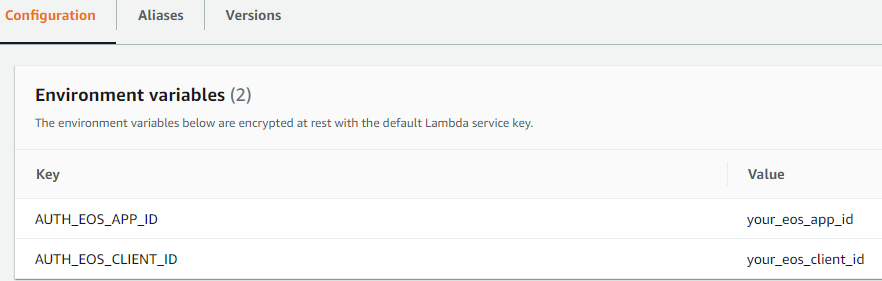
Just build this Lambda function in a Linux environment and upload it e.g. as Lambda function “authorize”. The function also validates AppId and ClientId, which need to be configured as Lambda environment variables (multiple values can be separated with ‘:’):
REST API Gateway Authorizer
Next step is to create the authorizer for the REST API Gateway. The following screenshot shows example settings:
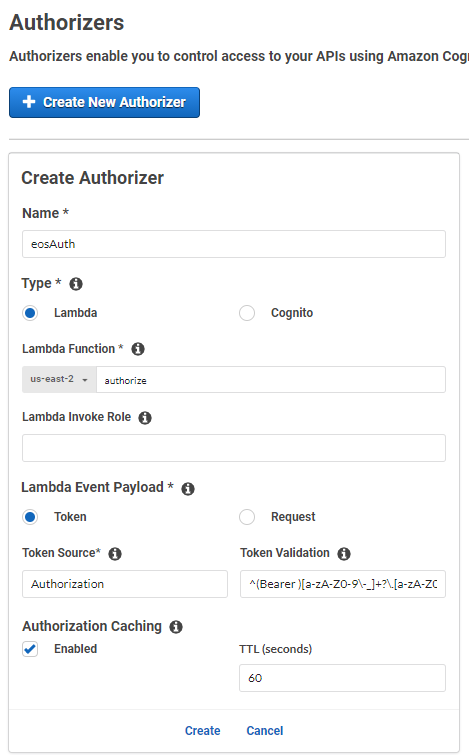
Values to enter:
- Token Source:
Authorization - Token Validation:
^(Bearer )[a-zA-Z0-9\-_]+?\.[a-zA-Z0-9\-_]+?\.([a-zA-Z0-9\-_]+)$
(Source for this: https://aws.amazon.com/de/blogs/security/use-aws-lambda-authorizers-with-a-third-party-identity-provider-to-secure-amazon-api-gateway-rest-apis/) - Authorization Caching: e.g. 60 seconds
Last but not least, you need to register this authorizer in the “Resources” section for each method request. After deploying these changes, the service methods are authorized and can be called using the same sample code as for the HTTP API Gateway.
Epic and Epic Games are trademarks or registered trademarks of Epic Games, Inc. in the United States of America and elsewhere.